Hello lovelies!
Here we are another Friday, wow these come round quickly!
Anyway as it's Friday that means another
VISIBLE IMAGE design team post from me.
I wanted to make a really cheery card today with a bright colour and also play with my new Big Shot die-cutting machine which I absolutely love!
The stamps I have used for the card I have made are all from the gorgeous
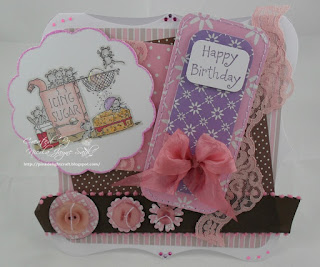
Here is my card...
The other materials and tools needed to make this card are...
~8"x8" scalloped card blank
~ DMC Thread Rose VY DK 326 and Antique Blue LT 932
~ Pokey tool and piercing mat
~ Creata Paper pad Die-cut and cardboard patterns - one dotty sheet and one patterened.
~ Sanding tool
~ Collall all purpose glue
~ Tim Holtz Distress Inks Worn Lipstick and Broken China
~ Memento Ink Tuxedo Black
~ Pinflair Silicon Glue
~ Sizzix Medallions die-cut set
~ Sizzix Basic Shapes die-cut set
~ Fabric scrap
~ Tim Holtz Distress Embossing Ink
~ Clear Embossing Powder
~ Heat Gun
~ Bone folder
~ Red Gingham Ribbon
~ 3 Pearl Head Pins
~ Mini Cotton Spool
~ 3 Red Heart Buttons
~ Corner Chomper
~ White Card Scrap
~ Self-adhesive Pearls
How to make...
~ Using your pokey tool and piercing mat, pierce holes in each scallop.
~ Use the rose thread and sew a running stitch along the scallops. Use the blue thread to do the same stitch in the spaces left from the first set of stitches.
~ Cut the red dotty paper to 7"x7". Use the sanding tool to sand all the edges.
~ Ink the edges with the Worn Lipstick and also the scalloped edges.
~ Pierce holes down one side and stitch blue thread along this.
~ Glue to the card blank with the Collall so it is at an angle.
~ Cut the patterned paper to 6"x6". Sand the edges and ink with the Broken China. Pierce holes to the right hand side and use rose thread to sew a border.
~ Glue using the Collall over the red dot paper at an angle as shown.
~ Using the black ink stamp the tape measures onto red dot paper. Cut out, sand and ink the edges with Worn Lipstick.
~ Attach at the bottom to create a border. Roll one end over so you see the other decorated side. Attach the other stamped tape measure over lapping the first one.
~ Die-cut the Medallion from patterned card, and also the hearts, one large from patterned card and one large and one small from the fabric scrap.
~ Glue the hearts in the bottom right corner and top left corner as shown.
~ Use the Pinflair glue to attach the medallion at the end of the tape measure.
~ Stamp the button from the
SEWING ROOM SET . Pierce 4 holes and add thread.
~ Glue to the centre of the medallion.
~ Stamp the dress makers dummy onto patterned paper using the embossing ink. Sprinkle with the clear embossing powder and melt with your heat gun. When cool, cut out carefully. Ink the edges with the Worn Lipstick and curve it slightly with the bone folder.
~ Tie the Gingham ribbon around the base as shown. Use the Pinflair to attach it to the card blank so it is slightly raised.
~ Stamp the cotton reel onto the red dot paper using the Broken China ink. Cut out just the reel part and wrap rose thread around it, glue to the card as shown. Stick the 3 pearl head pins into the threaded spool.
~ Wrap the blue thread around the mini spool and glue next to the red one.
~ Thread the 3 heart buttons with blue thread and glue down the right hand side of the card.
~ Stamp the 'Friends' Sentiment onto the white card using Worn Lipstick ink. Cut the ends to points, use the chomper to round the two corners as shown. Ink the edges.
~ Stamp the running stitch and zig zag stitch along the top and bottom of the sentiment using Broken China ink. Matt onto blue paper, round the corners and ink edges as before. Cut the ends to points. Matt this onto red dot paper and round corners and ink edges again, cutting ends to match the others. Punch a hole in the middle of the points and thread the ribbon through, use silicon glue to attach to the card so it is raised.
~ To finish, add the pearls as shown.
Phew, a lot of instructions but worth the effort! LOL I absolutely love the
SEWING ROOM SET
You can make so much with it. To see more ideas and inspiration hop over to the
VISIBLE IMAGE GALLERY where you will see lot's of design team creations!
I love working with them the quality is excellent, they are so easy to use, they ink evenly and give good clear, crisp results every time.
VISIBLE IMAGE will be appearing on Create & Craft TV on Saturday June 22nd at 10am.
Make sure you mark the date in your diary, on your calendar, a post it note or wherever you like to put your reminders for things. Believe me you WILL NOT WANT TO MISS THIS! I have had the pleasure of making some of the samples, and along with the rest of the
VISIBLE IMAGE DESIGN TEAM we can't wait for you to see them. Make sure you order your stamps and email in the show too on the day to say hello! Send your emails when the show is on to
studio@createandcraft.tv Add this to your email address book to save time on the day, and get your emails in. Mark and Cheremane would love to here from you all on the day. Show
VISIBLE IMAGE some love by saying hello!
Click
HERE to join the event on Facebook.
If you are going out, or will be working hit that record button so you don't miss the fabulous demos!
Now....a couple of more reminder's....don't forget to join in the
VISIBLE IMAGE JUNE CHALLENGE it's a brilliant theme and it certainly has 'Character'! LOL
We would love to see your creations for this, you never know you could be the lucky winner who receives £10 to spend on
VISIBLE IMAGE STAMPS
PLEASE NOTE: YOU MUST USE A REAL STAMP NO DIGIS ALLOWED!
More exciting news too.... the July issue of Craft Stamper magazine has a FREE stamp that Mark has designed. Some of the design team got inky with it. Make sure you buy your copy!
So, a very busy and exciting time ahead for us all!
Keep watching as there will be lot's of exciting things happening in our world!
I am entering my card into the following challenges...
Thank you for stopping by today, as always I do appreciate your visits and if you leave me some love, I am thankful for that too.
Have fun and happy stamping,
lots of love
Nicola XXX


