PLEASE 'LIKE' MY PAGE ON FACEBOOK - THANK YOU

Showing posts with label Letra Set Flexmarkers. Show all posts

Sunday, 16 August 2015

That Craft Place Challenge....Feeling Blue...

Hello lovelies!

The weeks are flying by, I can hardly believe we are halfway through August already. 

It's time for another challenge over at


Now, I know I'm usually on the mixed media team, but I also enjoy making cards. So, I do love to jump on board the card challenges too!

The challenge this time is the theme...

'Blue'


Here is the colour palette to follow...


I have used a cute stamp by Saturated Canary called
'Chasing Butterflies'

Ingredient's I used are...


Saturated Canary Chasing Butterflies Stamp ~ Broken China Distress Ink ~ Blue Pearlescent Card ~ Scalloped Card Blank ~ Blue Stamens

Crafty goodies from my crafty stash...

'Dear Friend' stamp by Hampton Art ~ Promarkers in shades Pastel Blue, Powder Blue, Denim Blue, Blue Pearl, Rock Pool, Capri Blue, ~ Flexmarkers in shades Glacier Blue, Blue Grey 3, Blue Grey 1, Dolpin Blue, Surf Blue ~ Docrafts Papermania Capsule Collection Parisienne Blue Papers, Die-cut Notelets & Big Bloomers ~ Blue Cotton Lace ~ Blue Fabric Butterflies ~ Fancy Stapler ~ Blue Gems

We would love to see your 'Blue' creations. Hop over to 
and see lot's of gorgeous design team inspiration!

I would like to enter my card into the following challenges...


Happy Crafting,
lots of love
Nicola 
XXX


Sunday, 4 August 2013

VISIBLE IMAGE - AUGUST CHALLENGE...MY DT POST...

Hello lovelies!

Welcome to the

VISIBLE IMAGE AUGUST CHALLENGE

We have a great theme again this month...

'ANYTHING GOES WITH A VISIBLE IMAGE STAMP '

PLEASE NOTE FOR THE CHALLENGE YOU MUST USE A VISIBLE IMAGE STAMP!

I have made my card using the gorgeous

CLARA
 
 
Other materials used to make my card...
 
~ Letraset Flexmarkers in shades: Skin: Antique White ~ Dusky Pink ~ Pale Pink ~ Pastel Pink
Hair: Linen ~ Sandstone ~ Nutmeg ~ Cappuccino
Eyes: Cloud Blue ~ Sea Mist
Rest of Clara: Shocking Pink ~ Sorbet ~ Wild Orchid ~ Pink Pearl ~ Pale Blossom ~ Blue Grey 2 ~ Blue Grey 4
~ Memento Ink Tuxedo Black
~ Tim Holtz Distress Ink Dusty Concord
~ White 8"x8" scalloped card blank
~ Spellbinders Nestabilities Fleur De Lis Rectangles
~ Joy Vintage Border Die
~ Creata Paper Pad
~ Organza Ribbon
~ Sizzix Medallions Die
~ 2 purple gem brads
~ 2 word grommets
~ Purple self adhesive pearls
~ Collal glue
~ Silicon Glue
~ Double sided tape
~ foam pads
 
To make the card...
 
~ Create the easel by scoring half way across the front panel of the card blank.
~ Stamp Clara with the Tuxedo black ink and colour.
~ Use the Fleur De Lis Rectangle to die cut Clara.
~ Matt onto pink spotty paper.
~ Ink the edges of pink spotty paper and matt using Collal glue onto the easel and the base of the card.
~ Trim purple paper to fit across the spotty panel on the easel, ink edges with Dusty Concord. Wrap a length of organza ribbon across the front, securing the ends with the double sided tape. Attach this to the spotty paper with the tape. Add a bow with the silicon glue.
~ Die cut the vintage border die using purple paper and glue to the card as shown.
~ Use foam pads to attach the Clara panel to the easel front.
~ Trim purple paper matt onto the pink spotty paper on the base, ink the edges first, then attach.
~ Die cut the medallions, add a brad through each grommet, secure into the medallion centres and attach to the card as shown.
~ To finish add the purple pearls as shown.
 
I love using CLARA she looks gorgeous in many colour ways!
 
 
We would love to see your entries for the VISIBLE IMAGE AUGUST CHALLENGE you could be in with a chance of winning £10 to spend on some gorgeous VISIBLE IMAGE STAMPS  I love using them the quality is brilliant and you get clean, crisp results every time!


Visible Image Blog Badge, Blinkie
 
Don't forget VISIBLE IMAGE  also have a group on Facebook which you can join by clicking HERE  It's a fun group with lots of inspiration to see using the stamps, and you will also see creations from myself and the rest of the design team.


Thank you for stopping by,
till next time...
 
Happy Stamping,
Lots of love
Nicola XXX

Sunday, 6 January 2013

Masked Stamping ...........

Hello lovelies and a very Happy New Year to you all.
 
I feel like it's been ages since I blogged but I have been staying with family for the festive holiday and only came home on Wednesday. I am also resting under doctors orders as I have a virus and a chest infection so I've been feeling pretty grotty! LOL
 
Anyway, I just wanted to share this card with you that I made for the Simply Cards & Papercraft Card Designer of the Year competition. The results have been announced in the magazine, so congratulations to all the winners your work is truly gorgeous.
 
This is one of three projects I made, I will show you the other two another day. I have used the Kanban Jasper stamp set and coloured the images with Letraset Promarkers and Flexmarkers. The technique used is 'Masked Stamping'.


To make this card I have used:
 
Kanban Clear Stamp set Jasper ~ Mememto Ink Tuxedo Black ~ Southfield Pure White Card 200gsm ~ Docrafts Papermania 8"x8" Kraft card blanks x 2 ~ Tim Holtz Distress Ink Vintage Photo ~ Letraset Promarker's in shades: Putty ~ Icicle ~ Warm Grey 1 ~ Warm Grey 2 ~ Tea Green ~ Duck Egg ~ Sandstone ~ Caramel ~ Cocoa
Letraset Flexmarker's in shades: Antique White ~ Light Fawn ~ Tea Rose ~ Blue Grey 3 ~ Soft Aqua ~ Champagne ~ Nutmeg ~ Saddle Brown ~ Decorative papers ~ Pearl brad ~ Self adhesive pearls ~ Flowers ~ Spiders Web ~ Tim Holtz findings ~ Pinflair glue ~ Double Sided Tape ~ 3D Foam pads
 
Step by Steps to make this...
 
1. Stamp lady onto card, stamp again onto scrap paper, cut out and lay mask over first dress. Stamp gent image so it is overlapping the mask. Stamp the trouser and coat hem again onto scrap. Cut out, lay over first image and stamp the cogs over lapping this. Leave the dress mask in place and stamp the stand over lapping this. Then stamp the clock face to make a free standing clock. Remove masks.
 
2. Colour the image with the Promarkers and Flexmarkers.
 
3. Score one card blank front in half. Cut the second card blank in half down the score line to make the easel front.
 
4. Ink the edges with distress ink.
 
5. Trim brown decorative paper 19cm x 19cm, use double sided tape to mat to front of card. Trim teal paper 16cm x 16 cm and fold over one corner securing with the pearl brad. Use ds tape and stick to the left hand side.
 
6. Trim image to size and matt onto rose paper using ds tape. Ink edges and fix to the card front with foam pads.
 
7. Trim decorative paper to fit the base of the easel, punch the corners on the second layer and a border on the top. Wrap a length of spiders web along it and make a bow. Mat with ds tape.
 
8. Add a greeting for the stopper using foam pads. Use ds tape to stick the front panel to the easel part.
 
9. Finally use Pinflair glue to fix the findings and flowers as shown, and finish with pearls.
 
You can change the colour scheme to suit your own taste, I really like these two colours together and I love the vintage feel of the card.
 
Thank you for stopping by today and I look forward to your next visit,
 
Have fun and happy crafting,
lots of love
Nicola XXX


Sunday, 2 December 2012

My DT card for the Flat Friends Challenge...

Hello lovelies,
 
I hope you are all keeping well and getting into the festive spirit now we are in December!
 
There is another fantastic challenge over at the
 
 
the theme is
 
'White on White with a Splash of Colour'
 
You need to use a Flat Friends Digi to enter the challenge. Emma has designed a Christmas Freebie for you to use called 'Crimbo Shopping'. Hop over to the challenge blog and get your free digi and join in the fun with this month's challenge.
 
The winner will be announced on the 1st January and will have their choice of 4 free Flat Friends Digis as their prize!
 
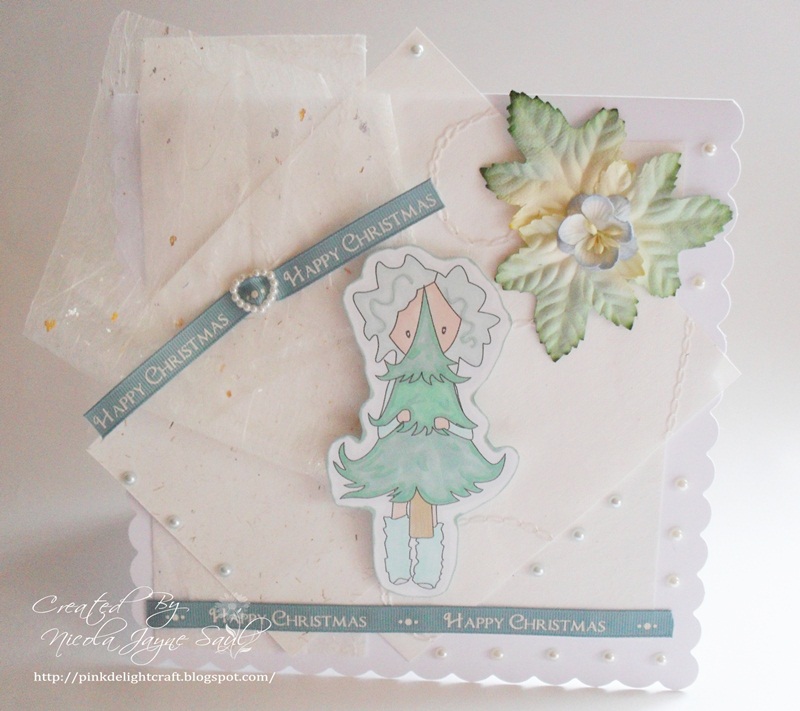
For my card I have used Tree Hugger which you can buy HERE 
I wanted to use lots of texture on my card so I have used various handmade papers...
 
 
I have coloured her with Letraset Promarkers and Flexmarkers in shades...
Promarkers: Mint Green ~ Soft Green ~ Pastel Green ~ Tea Green ~ Blender
Flexmarkers: Sandstone ~ Dusky Pink ~ Blue Grey 1
 
I wanted to keep my splash of colour very similar tones.
 
Myself and the rest of the design team would love to see your entries so don't forget to hop over and grab your free digi to join in!
 
Have fun and happy crafting,
lots of love
NJ XXX


Monday, 5 November 2012

My First Saturated Canary Image....

Hello lovelies,
 
I have just made a tag using a Saturated Canary Image that I have coloured in.
I have seen so many of these lovely images, lots of my crafty friends have been buying them. After seeing them so beautifully coloured, I decided to take the plunge myself.
 
I have to say I am loving them, I went to buy one image and ended up with eight lol. Now, I am not an expert at colouring so I need more practise. But...they say practise makes perfect...so I will keep practising!LOL
 
I have used a mixture of Letraset Flexmarkers and Promarkers to colour my image.
 
I am entering this tag into the
 
 
Saturated Canary Tag Contest!
 
 
The Saturated Canary Image is ~Thank You!
 
I have made a large tag using Kraft Card, run it through an embossing folder with a script pattern. Inked the edges and the embossing with Vintage Photo Distress Ink.
I have embellished with lace, ribbons and gems.
 
The colours I have used are:
 
Skin: Letraset Flexmarkers - Blush ~ Dusky Pink ~ Light Fawn ~ Tea Rose
Eyes: Flexmarkers - Glacier Blue ~ Soft Aqua - Sakura Clear Star pen
Hair: - Letraset Promarkers - Putty ~ Sandstone ~ Caramel ~ Cinnamon ~ Cocoa 
Dress, shoes & tights: Promarkers - Vanilla ~ Spice ~ Apricot ~ Honeycomb ~ Saffron ~ Sandstone
Around the image: Promarker Warm Grey 1
 
I hope you like my first Saturated Canary Image. I have a confession to make, I have made this tag on the larger size as I want to keep it and use it as a marker in my project book!
 
Thanks for stopping by and I look forward to your next visit!
 
Have fun and happy crafting,
lots of love
NJ XXX


Friday, 27 July 2012

Polkadoodles Design Team Card........

Hello lovelies,

well it's that time of the week again, yes it's Friday which means another fantastic challenge over at the


The theme this week is

'Summer'

and also to show some baking with the theme too!

For my card I chose to use the Candy Doodles Collectors Edition CD along with a gorgeous Emma Canning Digi Stamp Millie Birthday I love these digis which you can buy ready to download from Polkadoodles , they are not only gorgeous characters but have a fun element too and look fantastic coloured with any medium of your choice. I have also used a Marianne Design Die and I have made the pink candy swirl embellishment's using Fimo Clay and a texture sheet to make the swirls by pressing the fimo into it and then baking. I wanted these to look like sweet candy!


I love making easel cards, I also cut some strips of paper and curled to make them look like party streamers and I think the cupcake looks good enough to eat!LOL

I would love to see your entries for this theme, so hop over to the Polkadoodles Challenge Blog and take a look at the fabulous projects the rest of the design team have made.

Have fun and happy crafting,
lots of love
NJ XXX

Tuesday, 19 June 2012

Magnolia Cards Coloured Five Ways...

Hello my lovelies,

I have been a busy little bee over the last week with my crafting. Some of it has been design team work and then the rest of my craftiness has been playing with my Magnolia stamps and pens and pencils!LOL

I coloured the images last week and I have finally managed to finish making the cards today. I decided I wanted to have a play around with all my pens and pencils, so I decided to use different makes for each image. After doing this I have finally decided which my definite favourite colouring mediums are...there are two! That's my indecisive streak hahaha!

Anyway, let's make a start of showing you my colouring experiment's....go make yourself a coffee, grab a bar of choccie and sit back and relax...here goes.............

CARD 1...

Colouring medium used...Faber Castell Polychromo Pencils and Daler Rowney Low Odour Thinners ...
Shades used: Raw Umber ~ Dark Naples Ochre ~ Dark Chrome Yellow ~ Cadmium Orange ~ Dark Cadmium Orange ~ Cadmium Yellow ~ Light Yellow Green ~ Cream ~ Light Green ~ Leaf Green ~ Earth Green Yellowish ~ Light Ultramarine ~ Warm Grey 2 ~ Dark Red ~ Rose Carmine ~ Burnt Ochre.

I stamped the images using the masking technique to make it look like she is sat on the flower. I absolutely love colouring with my polychromo pencils. It does seem to take a bit longer than normal, as I like to blend the pencils with paper stumps and the Low Odour Thinners. I think though that the results are defintely worth the time it takes. It is like therapy too...very relaxing!LOL

Here's a close up of the colouring...


Here is the finished card...


CARD 2

Colouring medium used...Letraset Flexmarker's
Shades used: Blush ~ Rose Peach ~ Tea Rose ~ Light Fawn ~ Nutmeg ~ Sandstone ~ Cappuccinno ~ Buttercup ~ Blue Grey 1 ~Glacier Blue ~ Dove Grey ~ Sea Mist ~ Honeydew ~ Duck Egg ~ Firebrick

I have been using Flexmarker's since I got bought them from my husband as a Christmas Present. I was a lucky girl...he bought me every colour that was out at the time! Bless him! These are lovely to work with, the colour just flows so smoothly and they are very easy to blend with. A pleasure to use, with I think great results. You can also use them with your Promarker's too.

Here is the close up...


Here is the finished card...


CARD 3

Colouring medium used...Kuretake Zig Brushables
Shades used: Cool Cucumber ~ Platinum ~ Apricot ~ Pure Red ~ Pure Yellow ~ Powder Blue ~ Pure Orange ~ Baby Pink ~ Fawn

I have had these for a while and swap between using these and the flexmarker's. I like using these two and again they flow nicely and blend very well.

Here's a close up...


Here is the finished card...


CARD 4

Colouring medium used...Letraset Promarker's
Shades used: Cyan ~ Indigo Blue ~ Pastel Blue ~ Pastel Green ~ Henna ~ Pastel Pink ~  Tan ~ Honeycomb ~ Pastel Beige ~ Denim Blue ~ Cool Grey 4 ~ Cocktail Pink ~ Rose Pink ~ Cardinal Red

I don't have all of the colour's in the Promarker's. So I had to work with the small amount that I have. Again these are good to work with and you can use them also with the Flexmarker's. I still think I could have blended better, but as they say...practice makes perfect!

Here's a close up...


Here is the finished card...


and finally...

CARD 5

Colouring medium used...Whispers Strokes Pens
I am not able to tell you the names of the colours used as they are not listed on the pens for some reason.

I found that I did'nt blend my colours as well with these as the others, but then I just think that is down to my colouring!LOL

Here's a close up...


Here is the finished card...


I by no means claim to be an expert on colouring at all, I just absolutely love doing it! I wanted to experiment and see which I liked doing the most...so I have to say that my favourite's are the Polychromo Pencil's and the Flexmarker's...but the Zig Brushables come very close to them too!

I think it is important to remember that colouring should be fun and enjoyable, and to use the different mediums that are right for you. I have also coloured with distress inks before now using fine paint brushes. It's a case of what you fancy using at the time!LOL

I hope you have enjoyed my little experiment, I certainly enjoyed colouring and making the cards!

Thank you for taking the time to read and I do really appreciate all your comments...

have fun and happy colouring,
lots of love
NJ XXX


Friday, 25 May 2012

My DT card for Emergency Crafters......

Hello lovelies,

I hope you are looking forward to a lovely week-end. As it's Friday that can only mean one thing, another challenge over at


The theme this week is

'Dreamland'

We want to see fairies, unicorns, toadstools, whatever is your crafty dreamland. I have used an Angel for mine.

My 'Dreamland' hits a personal note for me today, as it would have been my Beautiful Dad's birthday! I feel like I have made my card for my Dad, and in my dream I see an Angel looking after him, the flowers represent the flowers my Dad used to tend to in his job as a gardener. I know he will be up there somewhere tending to Heaven's Garden!


The stamp is from Inkdinkado and it's Angels, I have used a Martha Stewart punch around the page too!

I could'nt let my Dad's day pass by without me saying...

'Happy Birthday my Beautiful Daddy, I miss you everyday and I am sure you will hear me somewhere up there'.


I would love to see your entries for this theme, as you can see, mine has come from the heart!

Have fun and happy crafting,
lots of love
NJ XXX

Sunday, 25 March 2012

Belles Strawberry Tea - one of my favourite stamps.....

Hello lovelies I hope you are all keeping well.

I have been very busy with lots of lovely design team work and scrapbooking too! Somewhere in between though I managed to create a card to enter into some fab blog challenges.

I have used one of my favourite stamps it is


 I absolutely love these stamps, so gorgeous.


The backing papers and sentiment I have used from the first edition of the Polkadoodles Pen & Paper Circle Club.
I love gauze in projects and think it suits the image really well.
I have coloured the image using my Letraset Flexmarkers in shades...
Tea Rose/Antique White/Sunkissed Pink/Light Fawn/Cappuccino/Sandstone/Nutmeg/Saddle Brown/Apple/Cool Aqua/Aquamarine/Duck Egg/Glacier Blue/Watermelon/Amaranth Red
I have used a  pearl trim at the base of the image and a border punch on the edge of the white strawberry paper. I have embellished with flowers, dew drops a silver heart bead. pins, lace and self-adhesive pearls.

I am entering this into the following challenges.....

The Poodles Parlour - Anything Goes Challenge

I hope you like this card and thanks for looking.

Have fun and happy crafting,
lots of love
NJ XXX


Friday, 24 February 2012

Polkadoodles Challenge DT Card ....have a peek and join in......

Happy Friday my lovelies,

well it's that time yet again another challenge over at the


It's a lovely theme and one to get you in the mood for better weather and sunshine!

The theme this week is...

Summer Fever & Stashbox stamp

You have to make a summery card and use a stamp from your stash box.
The stamp I used for my card is one that I forgot I had, I have stamps stored in different drawers and boxes. After having a rummage around I saw this and thought it was perfect for this theme!


Ingredients I have used .......

White A5 card blank/Spellbinders Grand Nestabilities Grand Labels Eleven/Ladybug and friends Rachelle Anne Miller Stamp/Letraset Flexmarkers in shades: Nutmeg,Sandstone,Buttercup,Champagne,Grass,Berry Red,Canary,Sorbet,Apple,Pumpkin,Blue Grey 1,Tea Rose,Antique White,Light Fawn/Memento Tuxedo Black Ink Pad/Tim Holtz Distress Ink Spiced Marmalade/Polkadoodles Crochet Cotton Lace - Tea Rose Pink
Heart shaped pin/Papermania self-adhesive dew drops/Sakura Gelly roll pen Clear Star.

How I made it......

I used the largest Grand Nestibilitie to cut my card blank. Printed out three co-ordinating sheets of backing paper, flowers, greeting and butterfly paper from the cd. Use the next three sizes down grands to cut a piece from each of the flowery papers.
Stamp the image onto white card, colour. Use the next size down grand and cut with your die-cutting machine.
Ink all the edges with the spiced marmalade.
Matt and layer the first two larger flowery labels.
Matt the image onto the smaller flowery label and then matt this to the base with foam pads.
Cut out the flowers and ink all the edges, attach as shown with foam pads.
Add the greeting, cut out the butterfly and attach with foam pads so its raised above the greeting.
Finally tie the crochet lace in a bow and attach, embellish with the heart pin.
Finish with the dew drops as shown and use the clear star pen to add sparkle to the butterfly.

I hope you like the card I have made for this theme. I think it's very summery, picking flowers in nice cheerful colours!

Myself and the rest of the Design Team would love to see your creations for this week's challenge.
So why not search your crafty stash and dig out that stamp you've had for ages and not used hardly if at all!LOL

Hop over here to add your entry


Have fun and happy crafting,
lots of love
NJ XXX


Wednesday, 22 February 2012

With Love.......

A happy hello to you all my lovely crafty friends.

Over the last few days I have been very busy with design team work, so I decided to make something to enter some challenges with.

I hope you like the card I have made, I love these colours and of course pink is my favourite colour of all!


Ingredients....

8x8 card blank/Fruit Garden 12x12 Paper Pad Tilda Panduro Hobby/Textured cardstock/cream card/Memento ink pad Rich Cocoa/Hero Arts Stamp Blooming Heart/Letraset Flexmarkers in shades...Pastel Pink,Shocking Pink,Saddle Brown/Greeting/Lace/Ribbon/Flowers/Bling/Decorative Pins.

How I made this...

Round the corners of the card blank. Cover with stripy paper from the 12x12 pack and trim. Ink the edges with the brown flexmarker. Attach a length of ribbon  the down the left hand side.
Cut textured cardstock 190mm x 140mm, round the corners ink the edges and stick to the base.
Cut flourish paper from the paper pack to 180mm x130mm, round the corners ink the edges and stick to the textured card stock.
Stamp the heart onto the cream card. Colour the flowers in with the pink flexmarkers, cut out the heart and ink the edges. Adhere to texture cardstock with foam pads and cut out carefully leaving a pink border. Use foam pads to attach this to the right of the card as shown.
Use brown, cream and pink lace to make a bow,glue to the top left corner and embellish this with bling, a flower and decorative pins.
Make a bow from the ribbon and attach to the ribbon already on the card.
Add your greeting to the bottom  and embellish with flowers, coiled stems and pearls.
Add pearls to the corners as shown.

I loved making this card, this stamp is one of my favourite stamps as you can use it for so many different occasions!

I am entering this card into the following challenges:


Thanks for peeking everyone and I really do appreciate you all showing the love! LOL
Have fun and a very happy crafting,
lots of love NJ
XXXXX


Sunday, 19 February 2012

Polkadoodles Show on Create and Craft - My Samples...

Happy Sunday my lovelies,

well I hope that you managed to tune into


to watch the fabulous Nikky from


showing you all the gorgeous


As I'm on the Polkadoodles Design Team I was lucky enough to get to play with this gorgeous cd and the new added elements to make my samples for the shows!

I am really, really excited to be able to show you my first TV Samples for Polkadoodles.....I hope you like them as much as I loved making them!

Enjoy browsing...........


I have used Letraset Flexmarkers to colour in the images, I think they are all so cute!


is a must have for your CD crafting collections, there are so many elements to this cd, not only all the lovely new images but loads of backing papers, sentiments, buttons, ribbon sliders...so many things to choose from that you can use over and over again!

Don't forget Nikky is back on our screens on Create and Craft at 5pm for the
Kuretake Zig show!

Thanks for peeking,
have fun and a very excited happy crafting from me lol,
lots of love
NJ XXX


Saturday, 18 February 2012

Another Belles n Whistles Stamp.....

Hello again lovelies...

I did have a busy afternoon yesterday and here is the other card I made using another Belles n Whistles stamp...I love these...I've got a few now but would still like them all!LOL


Ingredients...
Memento Rich Cocoa Ink Pad/Letraset Flexmarkers in shades: Blue Grey 1,Soft Khaki,Nutmeg,Antique White,Champagne,Sandstone,Light Fawn,Cappuccino,Buttercup,Tea Rose/Tim Holtz Distress Ink Frayed Burlap/Papermania 8x8 cream card blank/Decorative corner punch/Vintage lace/Decorative staples/Paper flowers/Hat pin/Ornate button

Recipe...

Print out your chosen decorative papers from the cd. I wanted to create a soft vintage look. Ink the edges of the card blank with the frayed burlap. Cut two co-ordinating papers to size, ink the edges and matt and layer to the card blank leaving a border on the card.Attach the lace across the bottom using your decorative staples.
Stamp the image onto card and colour. Trim to size and use decorative punch on each corner. Cut a piece of decorative paper to matt this onto, ink the edges then attach to the base with foam pads.
Make some paper flowers, I made two from the papers off the cd, the two larger brown ones are from card I already had in my crafty stash, the smaller brown one is made from a brown paper bag.
Attach these to the card, when the glue has dried ink the tops of the flowers using a sponge lightly.Stick some pearls in the centre of the flowers. Add the hat pin as shown.
Add the greeting and attach two gold pearls.
Add the ornate button.
Finish by adding the gold pearls to the top corners as shown.

A little tip: I have started saving any paper bags I get from shops now. Although they are thin, if you are careful they make great flowers like the one I have made using a circle from the brown paper bag I had.

I love the look of this card, I think the image is so cute!

I hope you have enjoyed reading how I made my cards and I look forward to showing you more of my creations,
thanks for looking I really do appreciate it!

Have fun, have a great week-end and a
very happy crafting,
lots of love
NJ XXX