PLEASE 'LIKE' MY PAGE ON FACEBOOK - THANK YOU

Tuesday, 22 March 2016

MDF Tool Caddy Tutorial

Hello lovelies!

 I'm going to show you how to decorate an MDF Tool Caddy.


Product's I've used are of course from my favourite shop

Product List...
MDF Tool Caddy ~ Americana Decor Chalk Paint Primitive ~ Craft Consortium Decoupage Paper White Crack Texture and Wild Meadow ~ Cosmic Shimmer Matt Glue, Seal & Glaze ~ Americana Decor Ultra - Matte Varnish ~ Cosmic Shimmer Colour Cloud Ink Decadent Oak ~ Cosmic Shimmer Acrylic Glue ~ Cosmic Shimmer PVA Dark Bronze ~ Ornate Pearl Sticker ~ Flowers ~ Flowers Linen Cotton Ribbon ~ Collall 3D Glue Gel

Already in my crafty stash...
Create Quote ~ Ecoline White Paint ~ Rigger Brush ~ Tim Holtz Findings Memory Key

Step By Steps...

1. Paint the inside of the two end panels, making sure you paint the edges. Paint the inside of the front & back panel, make sure you don't paint the tabs. Paint the edges of these and the edges of the middle section. Leave to dry. 
* I've left the base of the Tool Caddy unpainted. If you like to be a frugal crafter you will understand why. There is no point wasting paint on the bottom when you won't even see it. On the other hand, if I was giving this as a gift, then I would paint the bottom!*


2. When the paint is dry, paint over all the pieces with the Ultra-Matte Varnish. Leave to dry.

3. Paint the Matt Glue, Seal & Glaze onto oneside of the MDF centre panel. Tear a square of the crackle paper to fit the panel, leaving the tabs. Press onto the MDF, then sand away the edges. Paint over the matt seal glue and leave to dry. Repeat the same with the other side. Leave the glue to dry.
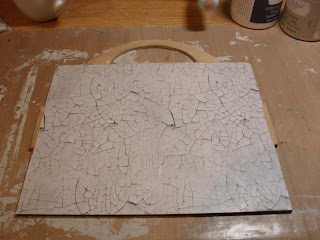
4. Use a sponge to apply the colour cloud to the handle and rub over the crackle paper.

5. Put the caddy together. Then paint glue over the joins to secure everything together.


6. Lay the caddy on it's side. Use the rigger brush, dip into the white ecoline, then tap the brush over the handle. This is really random, the little paint splatters will go on other parts of your caddy, but I quite like this. It's arty! Do the same on the other side, then leave to dry. 


7. Tear two pieces of the Wild Meadow Decoupage paper big enough to fit the outer panels and the front and back panel. Lay the paper on the front and back panels before applying glue and use a craft knife to trim to size.  Now cover the panels using the Matt Glue, Seal & Glaze. Smooth over the paper, sand away the excess paper and cover with another layer of the glue seal then leave to dry.


8. Carefully paint the Dark Bronze PVA at the bottom edges to finish off the panels. Use a fine brush and paint swirl lines along the edges of the sides.


9. Apply the ornate pearl sticker to the panel you want to be the front of the caddy.

10. Tie the cotton ribbon to the handle and tie a bow. Glue the Create Quote to the opposite side of the bow. Use a length of ribbon to thread through the key. Attach just below the bow at the front. Tie another bow at the back of the caddy. I know the key says 'memory' but I like it for this. Finish off by gluing the flowers on to the caddy. Finally fill the caddy with your tools!


I think the Tool Caddy looks very pretty sat on my desk!

I hope you have enjoyed my tutorial today. 
Happy Crafting,
Lot's of love
Nicola
XXX

LINKS YOU NEED TO KNOW


Bead Box Tutorial


Hello lovelies!

I have decorated a lovely wooden box to make a bead box.


The materials you need from That Craft Place 

Wooden Box ~ White Gesso ~ Texture Paste ~ Cog Stencil ~ Cosmic Shimmer Crackle Paints in shades China Pink, Heather , Jade Mint ~ Petal Lu Flowers ~ Pink Ruffle Edge Ribbon ~ Lilac Spiral Stems ~ Cosmic Shimmer Acrylic Glue

Materials already in my own crafty stash...
Spatula ~ Old credit card ~ Daler Rowney Interference Colour Shimmering Green and Shimmering Violet ~ Selection of Beads ~ Pearl Beads on Stems ~ Piece of Broken Jewellery

Step by Steps...

1. Paint the box all over, inside and out, and the dividers with gesso, Leave to dry.


2. Lay the Cog Stencil over the left half of the lid. Use your spatula to add a blob of texture paste onto the stencil.


Use the old credit card and spread the paste evenly over the stencil.

Flip the stencil around so that the pattern joins in the middle. Repeat the same steps  for the right side.


Leave this to dry thoroughly.

3. Paint the box lid with the Jade Mint crackle paint, the base with China Pink, and the inside with Heather. Paint the divider China Pink. Leave to dry. I left mine to dry overnight, you will see the crackles appear when dry.


4. Put a blob of each of the Interference paints onto your craft sheet. Spritz with some water on each blob. Mix each colour with the water to create a wash. Paint the violet on the inside of the box and paint the green interference over the lid and the rest of the outside of the box. Leave to dry. This creates a lovely shimmer effect.

5. Put the divider into place inside the box.  Glue the pink ribbon around the bottom edge. Embellish the top with your Spiral and pearl stems, flowers, beads and broken jewellery using the glue to stick everything into place. Finally fill with some pretty beads.


I hope you have enjoyed my tutorial for this pretty bead box. I really enjoyed decorating this. You could decorate these boxes as a gift for someone and fill it with pretty things they like.

Have fun,
Happy Crafting,
Nicola 
XXX

LINKS YOU NEED TO KNOW...


Sunday, 13 March 2016

That Craft Place Challenge - Anything Goes

Hello lovelies!

It's time for another challenge over at 


The theme is 

'Anything Goes'.

I've made a card using the new stamp set that Lisa brought to us on the Creative Expressions show on Hochanda this week.

I've coloured the fishes using Promarkers.

I've tried to make them look like strings of fishes fresh from a catch dangling down as the fishermen carry them from the harbour!


The MDF and co-ordinating stamps are fantastic!

We would love to see your creations for this challenge. Hop over to the blog to see the rest of the design team inspiration.

Happy crafting,
Nicola 
XXX

LINKS YOU NEED TO KNOW


Tuesday, 8 March 2016

Bead Box Tutorial Over At That Craft Place

Hello lovelies!

It's my turn for a tutorial over at 


I've decorated a wooden box to create this lovely 

Bead Box


To see my tutorial for this box hop over to 


Happy Crafting,
Lots of love
Nicola 
XXX

Sunday, 28 February 2016

That Craft Place Challenge - Anything Goes

Hello lovelies!

It's time for another challenge over at 


The theme is

'Anything Goes'

I've made a card for my design team project.

I've used the really cute 


I've teamed this digi up with the gorgeous Graphic 45 World's Fair Paper Pad. I've coloured using Sakura Gelly Roll pens, I wanted to give our little magician a bit of sparkle. The hair and skin I've used Copics.
I've used a banner die that I cut out 3 times and layered up, then embellished with straws, twine and stars.

Product's from THAT CRAFT PLACE 

It's Magic - Bubble Digi from the Etsy Shop ~ Graphic 45 Worlds Fair Paper Pad ~ Pearlescent Card ~ Copics E11, E21, E00, R20, E04, E77, E71, E74, ~ double sided tape ~  3D foam pads ~  Cosmic Shimmer Colour Cloud Ink Ocean Blue ~ 7"x7" card blank.

Product's I already had in my crafty stash...

 Twine ~ Sakura Gelly Roll Pens Clear Star, Golden Star, Blue Star, Copper Star, Red Star, Bronze Sparkle, Dark Blue Sparkle, Purple Star ~ Star self-adhesive gems ~ Paper Straws

I love this little cutie and the Graphic 45 papers.

Hop over to 


To see lot's more gorgeous design team inspiration!

Happy crafting,
Lot's of love
Nicola 
XXX

LINKS YOU NEED TO KNOW


Sunday, 14 February 2016

That Craft Place Challenge - Anything Goes

Hello lovelies.

It's time for another fabulous challenge over at 


The theme is 

'Anything Goes'

For my design team project I've chosen to decorate one of the MDF Tool Caddy's, available of course from
THAT CRAFT PLACE . I've decorated this using Chalk paint's and Craft Consortium decoupage papers.


The tool caddy looks really pretty sat on my desk. 


To see the full product list and a step by step tutorial for this project, hop over to
on
Tuesday 23rd February

I have done a step by step tutorial to show you how to create this beauty!

Don't forget to hopover to 
To see lot's of design team inspiration.

Have fun and happy crafting
lot's of love
Nicola
XXX

LINKS YOU NEED TO KNOW


Sunday, 31 January 2016

That Craft Place Anything Goes Challenge With a Blog Hop

Hello lovelies
Its Challenge time at 
And Our Challenge this time is Anything Goes 
Our Prize is 
5 images of your choice  from our store 

We also have a blog hop with our new release 

Meet the new Bubbles 
The winner of the blog hop will win the full collection from the 
new release  

I've used the cute Petal, I've coloured her with Promarkers and embellished with Petal Lu flowers.  


Now its time to showcase our amazing DT 

Make sure you hop on over to their blogs leave them some love and be in a chance to win the whole collection 

Lisa 


Lucy

Sam


Lucinda

Have fun,
lot's of love
Nicola 
XXX

Links you need to know 

The coupon code which will run until 14th Feb is: THATCRAFTPLACEGP25