PLEASE 'LIKE' MY PAGE ON FACEBOOK - THANK YOU

Sunday, 24 May 2015

That Craft Place DT Project...Mixed Media

Hello lovelies!

I am so excited to be showing you my first design team project for 


The challenge theme this time is

'Shabby Chic'.

I have been chosen to be part of the Mixed Media team. I love to get all painty, inky and very messy! 

For my 'Shabby Chic' Mixed Media project, I wanted to show you a tutorial too. I thought it would be nice for you to see how I created my lovely box to store

'Pretty Lace and Pins'


I started with this MDF box, which I already had in my crafty stash.


The lovely items I used to create this are as follows...


Hearts Stencil, Greyboard ornate panel, MDF butterflies, Greyboard Keys, Betty Boots Clear Stamp Set, Cosmic Shimmer Acrylic Glue.

Items which I already had in my crafty stash...

Gesso, Texture Paste, Sea sponges, 6 Spatulas, Scrap lace panel, Sequin waste, Fork, Skewer, Shotcup, Spoon,
Acrylic Paints in shades - Mint Green, Victorian Rose, Baby Blue, Light Blue, Purple Lilac, Jamaican Sea, Sunflower, Ballet Pink, Spring Rose, Skintone, Titanium White, 
Ranger Crackle Accents, Deco Art Glamour Dust, Distress Inks Squeezed Lemonade, Shaded Lilac, Peacock Feathers, Victorian Velvet, Tim Holtz Grunge paper, Tim Holtz Sizzix Dies Elegant Flourishes, Tattered Floral, Tattered Leaves, Ornate buttons, Heart Charm, Blue Ribbon, Letter Brads, 'Gather' metal charm, lock & 2 brads, Clock hands & 1 brad, Pins, Trinket Finding, Metal Flowers, Lace, Linen, K & Company Metal Art Keys. 

Step by Steps...

Paint the box inside and out with Gesso. I gave it two coats.


Paint the spatulas with Gesso.


Paint the outside of the box Mint Green. Edges and inside the lid with Victorian Rose. Inside base with Baby Blue. Leave to dry.


Apply Texture paste by painting over the materials. Use the fork, spoon, skewer and shotcup to create patterns in the paste. Leave to dry.


Paint the greyboard pieces and mdf butteflies with Gesso, Leave to dry.


Paint the spatulas with Mint Green, Victorian Rose and Baby Blue. Leave to dry.


Paint the stencilled hearts, greyboard pieces and mdf butterflies using Light Blue & Purple Lilac paints.


Use seasponges and brushes to dab and brush the paints over the box. This is a very random technique. Work until you've acheived the result you like. Leave to dry.


Paint the Crackle Glaze over the front of the box. While wet, sprinkle the Glamour Dust in random areas. Leave to dry. This could take between 1 - 4 hours. 


Use the seasponges and brushes to paint the spatulas, greyboard and mdf as before. Use the distress inks around the edges. 


Stamp over the greyboard, mdf and spatulas using the Betty Boots stamp set and Distress Inks.


Die cut the flowers, leaves and flourishes from the grunge paper. Paint some of them in two tone colours, and some of them plain colours with a sprinkling of Glamour Dust while they are wet. Leave to dry.


When dry ink the edges with Distress Inks.


Shape the flowers and glue together. Add the ornate buttons to the center of six flowers, and the heart charm and ribbon to one flower center.


Add the brads to the decorative greyboard to spell out
'Pretty Lace And Pins'. Glue this to the base. Add the heart over lapping the stamped watch face. Secure the gather word to the opposite corner.


Glue a piece of linen onto the inside of the box, for the pins. Fill with pretty lace.


Glue the decorated spatulas around the sides of the box.


Finally, embellish the front with the flowers, lace, locks and keys and other findings.


I absolutely loved decorating this box. I love the Shabby Chic colours. It's amazing what household items you can use in Mixed Media work to create texture. 

Don't forget to hop over to 


to see the wonderful creations from the rest of the design team.

We would love to see your entries for this challenge.

I hope you have enjoyed my tutorial. Thanks for visiting.

Have fun and happy crafting,
lots of love
Nicola
XXX

Saturday, 16 May 2015

Crafting Musketeers Midway Reminder...

Hello lovelies!

Well we are halfway through the month already, time is whizzing by. 

That can only mean one thing, it's time for the 


It is also the 2nd Birthday of the 

Crafting Musketeers.

Happy Birthday teamies!

We have 2 fantastic sponsors this month, so theres going to be 2 winners.

The prize from JDG Crafts will be something of their choice, and from Hobby House a voucher to use on their website.

The theme for Challenge 25 is 'Use a Die Cut'.

I have used Crafters Companion Die'sire Floral Flourish.


I wanted to keep the background quite simple, so as to show off the pretty die. 

I love pink & purple together.

We would love to see your creations for this challenge, hop over to the 


to see the rest of the fabulous design team inspiration.

Thank you for stopping by today,
I always appreciate your visits.
Happy crafting,
lots of love
Nicola 
XXX


Monday, 4 May 2015

Altered Notebook...

Hello lovelies!

Well today I have another tutorial to show you. I have made this to enter into the challenge over at


The theme is 'No Cards'.

As I love notebooks and stationery, I knew this was the perfect thing for me to alter. I will use it for my creative ideas!

My finished 'Altered Notebook'.


Here is how I made it...

Ingredients used...


Hearts Stencil, Live Laugh Love Stencil, Cosmic Shimmer Acrylic Glue, Cosmic Shimmer Acrylic Paint Pink Plum, Cosmic Shimmer Acrylic Paint Tarnished Silver, MDF Cogs, MDF Butterflies, Greyboard Key.

Other ingredients used...

Blank notebook, 1 sheet of Kraft card, Wicker White Acrylic Paint, Glitter Glaze, Crafters Companion Journal Jottings Stamp Set, Paper Artsy Crunchy Waxed Kraft Paper, 3 brads, Crafters Companion Textures 8x8 Embossing folder Leaf Vein, Acrylic Metallic Paint Plum, Gesso, Texture Paste, Tim Holtz Distress Inks Dusty Concord & Picked Raspberry, Embossing Ink, Cosmic Shimmer Ultra Thick Embossing Crystals Tropic Violet, Silver Spiders Web, Skeleton Leaves, Pink Satin Ribbon, Silver Satin Ribbon, Lilac Satin Ribbon, Pink Twine, Purple Twine, 3 fabric flowers, 3 wooden buttons, String, Flower Trim, Paperstraw, Pink & Purple beads, Flower, Butterfly & Key Charms, Pink & Purple Flocking Powder, Pink & Purple Glitter.

The Torso embellishment I already had in my craft stash. I made this by melting Ultra Thick Embossing Crystals in my melt pot, then poured it into a mould.
The Fimo embellishments, again I already had in my stash. I made them using pink and purple fimo. I rolled out the fimo, stamped into it using a swirl stamp, then cut out small circles to create swirl embellishments.
The flat swirl embellishment was made by stamping into Ultra Thick Embossing Crystals.


Method...

Use the folder to emboss your kraft card.


Layout your notebook.


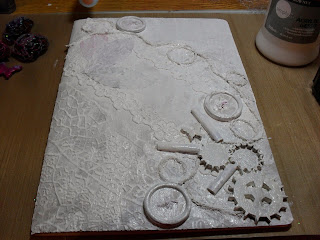
Plan what you would like where. Tear the embossed card in half and lay in the bottom and top corner as shown. Lay your other elements roughly in place. When your happy with the layout, glue everything into place. Leave to dry.


While waiting for the glue to dry, cut random circles from the wax paper. I've layered 7 sheets together. 


Put a brad into each centre.


Manipulate each layer of wax paper by scrunching until you have the result you like to create a paper flower. 


Continue until you have done all 3.


Put the paints, glitter & flocking powder into foil trays.


Dip one flower into purple paint, then dip into glitter and flocking powder. Do the same with the other two flowers, using the other paint colours.


Dip one of the MDF butterflies, and 3 of the fimo swirls into the paints, glitter and flock. Leave to dry.


Lay your book with the dried elements on your work surface.


Paint over the whole book with the Gesso. Leave to dry.


Lay the heart stencil over the centre of the book. Paint over the texture paint.


Lift away the stencil and leave to dry.


Add the purple, pink & silver paints into the foil tray. Add some more into the other 3 sections of the tray, add wicker white and glitter glaze into these and mix together. 


Now start to apply the paints over the book using  brushes and sea sponges. Build up the colour until your happy with the result. Leave to dry.


Tap the embossing ink over the butterfly and the key. Sprinkle over the crystals. 


Heat with your heat gun until they are melted. Repeat twice more.


Cut 3 lengths of ribbon and 2 lengths of twine. 


Attach to the back inside cover of the book. Tie the 3 charms to the twine. This is now your page marker.


Lay the hearts from the Live Laugh Love stencil over the top corner.


Sponge over the distress inks.


Stamp the journal page onto white card.


Write your text onto this and cut out. Sand the edges and ink.


Stamp the circles stamp over a couple of areas of the book.


Finally add the embellishments and flowers to finish of the altered notebook.


I glued the beads into the middle of the wood buttons and sprinkled over the glitter.


The painted textured hearts.


The finished altered notebook.


I love this book, pink is my favourite colour. I will be using this for my 'Creative Ideas'.

I am also entering this into the challenge over at 


for the 

' No Cards ' theme.

I have really enjoyed making this, and showing you how I did it. I hope you have enjoyed reading how I altered this.

Thank you for stopping by, I always appreciate your visits.

Happy crafting,
lots of love
Nicola 
XXX