PLEASE 'LIKE' MY PAGE ON FACEBOOK - THANK YOU

Monday 27 February 2012

Crafty Bloggers Network DT Card - Challenge 15

Hello my lovelies,

I hope you have all had a good week-end.

So today see's another challenge over at the


The theme this week is

Spring Time


I have used my Do Crafts Digital Designer Spring Chic Cd for this card.
I love this image, it's so cute.
I have used a template off the cd for the card blank and decoupaged Tatty Ted.
I have embellished with buttons, a ribbon bow and liquid pearls.
Hope you like it. I want an Easter Egg now lol.

I would love to see your entries for this theme,
have fun
happy crafting
love NJ XX


Sunday 26 February 2012

Polkadoodles Bee Happy Digis.....I have been playing.......

Happy Sunday my lovelies,

I hope you have all had a lovely week-end so far!

I have been playing this morning with some new digi images from Polkadoodles

they are gorgeous


and


Here are the three cards I made today...


I used a white square card blank for this card. I used the backing papers and sentiment stamp from the Polkadoodles Pen & Paper Circle Issue 1.....

PLEASE NOTE: The Pen & Paper Circle Issue 2 is available now for pre-order until the 7th March. If you don't want to miss out make sure you hurry to get your order in before the deadline!

I matted and layered the image, backing papers and textured cardstock, inking the edges first with a Letraset rose pink promarker pen.I also added a flower brad and dragonfly brad to the layers before sticking to the base.

I have used pink, lilac and black bakers twine and plaited the three colours together.

I stamped the sentiment onto a piece of the backing paper, cut out and attached as shown with foam pads.

I love this coloured digi, its perfect for a lovely cheery card and for any occasion too.

**********
For the second card I used backing papers and sentiment from the


I shrunk the Bee Happy digi so it was quite small and printed an A4 sheet of these. I cut three of the images out and coloured with Letraset Promarkers.
I added gingham ribbon to the backing paper before sticking it to the base card.
I matted and layered the coloured images onto textured cardstock and backing paper,inking the edges with a yellow promarker.
I added Stickles Diamond glitter glue on the bee wings and the trail behind it.
I wanted the squares of the images to look like tiles so when the Stickles had dried I used Glossy Accents to cover the squares.
To finish I added a gingham bow and cut out the sentiment to fit between the tiles.

**********

The third card I made I have used the coloured Bee Happy Digi

and the


I covered the base card with a sheet of backing paper from the cd.
I printed out the Bee Happy Digi three times and cut out various elements from two of the images so I could decoupage them.
I matted the image onto co-ordinating decorative paper, added the cut out elements with foam pads and used Stickles glitter glue in Fruit Punch and Diamond.
I pleated organza ribbon as shown, threading it through a cut out ribbon slider from the cd. I added a flower and flower gem to the centre.
To finish I added a greeting and a butterfly both from the cd.

I hope you like these cards I have made. I wanted to show you three ways of using these images. I have other ideas too how to use these images, but I ran out of time today!
The great thing with CD's and Digi's is the fact that there are so many different ways to use them. It's just a case of using your imagination!LOL

Don't forget also that Nikky from Polkadoodles

is back on

Create & Craft TV

on

Tuesday 28th February

at

10am

If you haven't already ordered the


then I would say don't hesitate to buy it.
Everything about it is gorgeous.....
you can see what you can make here at the


and finally just another reminder that you have only until the 7th March to get your pre-order in for the


Believe me it's going to be another fantastic issue with lot's of inspiration!

Enjoy the rest of Sunday and thank you for reading my ramblings lol.

Have fun and a very happy crafting,
lots of love
NJ XXX


Friday 24 February 2012

My DT Card for Glitter Geeks this week.......

Hello lovely crafter's,

it's time for another challenge over at the


The theme this week is

St.David's Day


I have made this card using Serif Craft Artist Platinum Edition. I printed my chosen layout twice.
I cut a square of decorative paper from the First Edition 12x12 Spring Feast paper pack inked the edges using Tim Holtz distress ink peeled paint. I then matted onto a kraft 8x8 card blank.
I cut one layout to size, inked the edges and matted to the base. I then cut the petals away from the daffodil on the second layout so I could decoupage them as shown.
To embellish I used yellow grosgrain ribbon and made a knot, added self adhesive dew drops, and used Sakura gelly roll clear star pen around the daffodils just to add a bit of shimmer.

I would love to see your entries for this theme,
don't forget to hop over to the


and see what the rest of the design team have made,

have fun and happy crafting,
lots of love
NJ XXX


Polkadoodles Challenge DT Card ....have a peek and join in......

Happy Friday my lovelies,

well it's that time yet again another challenge over at the


It's a lovely theme and one to get you in the mood for better weather and sunshine!

The theme this week is...

Summer Fever & Stashbox stamp

You have to make a summery card and use a stamp from your stash box.
The stamp I used for my card is one that I forgot I had, I have stamps stored in different drawers and boxes. After having a rummage around I saw this and thought it was perfect for this theme!


Ingredients I have used .......

White A5 card blank/Spellbinders Grand Nestabilities Grand Labels Eleven/Ladybug and friends Rachelle Anne Miller Stamp/Letraset Flexmarkers in shades: Nutmeg,Sandstone,Buttercup,Champagne,Grass,Berry Red,Canary,Sorbet,Apple,Pumpkin,Blue Grey 1,Tea Rose,Antique White,Light Fawn/Memento Tuxedo Black Ink Pad/Tim Holtz Distress Ink Spiced Marmalade/Polkadoodles Crochet Cotton Lace - Tea Rose Pink
Heart shaped pin/Papermania self-adhesive dew drops/Sakura Gelly roll pen Clear Star.

How I made it......

I used the largest Grand Nestibilitie to cut my card blank. Printed out three co-ordinating sheets of backing paper, flowers, greeting and butterfly paper from the cd. Use the next three sizes down grands to cut a piece from each of the flowery papers.
Stamp the image onto white card, colour. Use the next size down grand and cut with your die-cutting machine.
Ink all the edges with the spiced marmalade.
Matt and layer the first two larger flowery labels.
Matt the image onto the smaller flowery label and then matt this to the base with foam pads.
Cut out the flowers and ink all the edges, attach as shown with foam pads.
Add the greeting, cut out the butterfly and attach with foam pads so its raised above the greeting.
Finally tie the crochet lace in a bow and attach, embellish with the heart pin.
Finish with the dew drops as shown and use the clear star pen to add sparkle to the butterfly.

I hope you like the card I have made for this theme. I think it's very summery, picking flowers in nice cheerful colours!

Myself and the rest of the Design Team would love to see your creations for this week's challenge.
So why not search your crafty stash and dig out that stamp you've had for ages and not used hardly if at all!LOL

Hop over here to add your entry


Have fun and happy crafting,
lots of love
NJ XXX


Wednesday 22 February 2012

Polka Doodle Dandies on Facebook....

Hello lovelies,

I just wanted to share with all you


fans

we have a group on Facebook called

Polka Doodle Dandies!

It's a great place to be where you can talk about and share your love for all things Polkadoodles!

You can show us some of your creations too when you've used Polkadoodle products.

I know also that some of the Design Team members drop in including myself.

There is also a challenge in the group too that you can take part in.

So if you would love to be a part of this group, hop over to Facebook and request to be added to

Polka Doodle Dandies

 or add me as a friend on FB saying you want to join the group and I can add you to it.

It's a fun fun fun place to be so don't miss out,
have fun and happy crafting,
lots of love
NJ XXXX

With Love.......

A happy hello to you all my lovely crafty friends.

Over the last few days I have been very busy with design team work, so I decided to make something to enter some challenges with.

I hope you like the card I have made, I love these colours and of course pink is my favourite colour of all!


Ingredients....

8x8 card blank/Fruit Garden 12x12 Paper Pad Tilda Panduro Hobby/Textured cardstock/cream card/Memento ink pad Rich Cocoa/Hero Arts Stamp Blooming Heart/Letraset Flexmarkers in shades...Pastel Pink,Shocking Pink,Saddle Brown/Greeting/Lace/Ribbon/Flowers/Bling/Decorative Pins.

How I made this...

Round the corners of the card blank. Cover with stripy paper from the 12x12 pack and trim. Ink the edges with the brown flexmarker. Attach a length of ribbon  the down the left hand side.
Cut textured cardstock 190mm x 140mm, round the corners ink the edges and stick to the base.
Cut flourish paper from the paper pack to 180mm x130mm, round the corners ink the edges and stick to the textured card stock.
Stamp the heart onto the cream card. Colour the flowers in with the pink flexmarkers, cut out the heart and ink the edges. Adhere to texture cardstock with foam pads and cut out carefully leaving a pink border. Use foam pads to attach this to the right of the card as shown.
Use brown, cream and pink lace to make a bow,glue to the top left corner and embellish this with bling, a flower and decorative pins.
Make a bow from the ribbon and attach to the ribbon already on the card.
Add your greeting to the bottom  and embellish with flowers, coiled stems and pearls.
Add pearls to the corners as shown.

I loved making this card, this stamp is one of my favourite stamps as you can use it for so many different occasions!

I am entering this card into the following challenges:


Thanks for peeking everyone and I really do appreciate you all showing the love! LOL
Have fun and a very happy crafting,
lots of love NJ
XXXXX


Monday 20 February 2012

DT Card for Crafty Bloggers Network......Challenge 14

Hello my lovelies,
I hope you have all had a lovely week-end.

Well today sees the start of another fab challenge over at the


The theme for Challenge 14 is....

Shabby Chic!

Here's what I made for my design team card....


Here's what I used to make this card...

Papermania 8x8 card blank/Forever Friends Pink Parfait A4 paper pack/Papermania Summer Bloom Sweetie Brad/Vintage Sheer Flower Ribbon/ Pearl strand/ Lace/Doily/Flowers/Fabric brad/Feather/Pearly stem flowers/Ribbon bow/Tim Holtz Distress Ink Worn Lipstick/Dew Drop Brilliance Pigment Ink Pearlescent purple/Cosmic shimmer Cosmic Twinkles in Iced Candy/Self adhesive pearls/ Kanban greeting.

Here's how I made it...

Cover the card blank with a sheet of paper from the pad with the bear wearing the hat on it. Make sure its sat at the bottom right corner.
Cover the left side of the card with a co-ordinating piece of paper.
Use a distressing tool or nail file to scratch around the edges to give them a shabby look, ink around the edges with worn lipstick.
Attach the sheer ribbon, pearl strand, and lace so one sits on top of the other, securing the ends of each on the underside of the front with double sided tape.
Use a sponge to ink the doily using both your inks randomly. Also ink the flowers and the fabric brad too. Attach all of these to the top right corner with the brad.
Cut out another bear from the paper pack and attach on top of the other one with foam pads.
Stick the feather and the pearly stem flowers to the underside of the hat. Stick a hat pin through the flower on the hat and add cosmic twinkles to the flower. Glue a ribbon bow to the side as shown.
Add the decorative brad to the bottom left corner.
Stick three hat pins into the doily and flowers as shown.
Add the pearls as shown around the edges of the card and finally ink the edges of your greeting with worn lipstick and attach to the card with foam pads.

We would love to see your creations for this challenge and hope that you will join in with the fun.

Happy crafting everyone,
lots of love
NJ XXXXX

Sunday 19 February 2012

Polkadoodles Show on Create and Craft - My Samples...

Happy Sunday my lovelies,

well I hope that you managed to tune into


to watch the fabulous Nikky from


showing you all the gorgeous


As I'm on the Polkadoodles Design Team I was lucky enough to get to play with this gorgeous cd and the new added elements to make my samples for the shows!

I am really, really excited to be able to show you my first TV Samples for Polkadoodles.....I hope you like them as much as I loved making them!

Enjoy browsing...........


I have used Letraset Flexmarkers to colour in the images, I think they are all so cute!


is a must have for your CD crafting collections, there are so many elements to this cd, not only all the lovely new images but loads of backing papers, sentiments, buttons, ribbon sliders...so many things to choose from that you can use over and over again!

Don't forget Nikky is back on our screens on Create and Craft at 5pm for the
Kuretake Zig show!

Thanks for peeking,
have fun and a very excited happy crafting from me lol,
lots of love
NJ XXX


Saturday 18 February 2012

Polkadoodles on Create and Craft TV tomorrow.....

Good evening you lovely crafters,

I just wanted to let you all know that the fabulous

Nikky from  Polkadoodles

will be back on our screens tomorrow on

Create and Craft TV

 with the Polkadoodles shows at

9am and 2pm

and Kuretake Zig at

5pm.

Don't forget to tune in for the Polkadoodles shows, it really is something gorgeous! If you keep an eye out you might even see some of my samples that I have made for the shows using this gorgeous crafty must have! That's all I'm saying....when I can I will show you my sample cards here. All I will say is I loved working with this item and you have so much to play with....hahahaha I'm saying no more!

If your going out...hit the record button don't miss out, believe me it really is lovely!

Have fun, tune in and don't forget to email into the show and send Nikky and Polkadoodles the love.....

have fun and happy viewing and crafting,
lots of love
NJ XXX

Another Belles n Whistles Stamp.....

Hello again lovelies...

I did have a busy afternoon yesterday and here is the other card I made using another Belles n Whistles stamp...I love these...I've got a few now but would still like them all!LOL


Ingredients...
Memento Rich Cocoa Ink Pad/Letraset Flexmarkers in shades: Blue Grey 1,Soft Khaki,Nutmeg,Antique White,Champagne,Sandstone,Light Fawn,Cappuccino,Buttercup,Tea Rose/Tim Holtz Distress Ink Frayed Burlap/Papermania 8x8 cream card blank/Decorative corner punch/Vintage lace/Decorative staples/Paper flowers/Hat pin/Ornate button

Recipe...

Print out your chosen decorative papers from the cd. I wanted to create a soft vintage look. Ink the edges of the card blank with the frayed burlap. Cut two co-ordinating papers to size, ink the edges and matt and layer to the card blank leaving a border on the card.Attach the lace across the bottom using your decorative staples.
Stamp the image onto card and colour. Trim to size and use decorative punch on each corner. Cut a piece of decorative paper to matt this onto, ink the edges then attach to the base with foam pads.
Make some paper flowers, I made two from the papers off the cd, the two larger brown ones are from card I already had in my crafty stash, the smaller brown one is made from a brown paper bag.
Attach these to the card, when the glue has dried ink the tops of the flowers using a sponge lightly.Stick some pearls in the centre of the flowers. Add the hat pin as shown.
Add the greeting and attach two gold pearls.
Add the ornate button.
Finish by adding the gold pearls to the top corners as shown.

A little tip: I have started saving any paper bags I get from shops now. Although they are thin, if you are careful they make great flowers like the one I have made using a circle from the brown paper bag I had.

I love the look of this card, I think the image is so cute!

I hope you have enjoyed reading how I made my cards and I look forward to showing you more of my creations,
thanks for looking I really do appreciate it!

Have fun, have a great week-end and a
very happy crafting,
lots of love
NJ XXX


Card made using my new Belles n Whistles Stamps..

Hello again my lovely crafting friends!

Well yesterday was an exciting day as my lovely new crafty stash turned up just in time for me to play with it yesterday afternoon.

I absolutely love the Belles n Whistles stamps, the whole range of them are gorgeous. If you haven't tried any yet give them a go.

So here is the card I made first.....


Ingredients....

Memento Tuxedo black ink pad/Papermania 8x8 cream card blank/
Belles n Whistles Tea Time Stamp/Letraset Flexmarkers in shades: Wild Orchid, Light Fawn, Champagne,Antique White,Buttercup,Nutmeg,Soft Mauve,Soft Aqua,Cappuccino,Glacier Blue,Honeydew,Meadow Green,Tea Rose,Watermelon,Apple,Grass/
Marianne Design Creatables Swirl Flower
Two small purple flowers/Polkadoodles Black Gingham Ruffle
Gold coloured self adhesive pearls/Polkadoodles Candy Floss Dew Drops

Recipe....

Round the corners of your card blank.
Cut your backing paper you have chosen from the CD to size so you have a border on the card blank. Round the corners, attach the gingham ruffle to the bottom and then stick this to the card front. Use your die-cutting machine to cut out the largest of the Labels one with decorative backing paper and the next size down using white card for the image. Also die-cut your swirl flowers using the same paper used for the larger nestie, you want two of these.
Stamp the image on your die-cut label and colour.
Add the large label with foam pads, tuck the swirls under the corners as shown.
Attach the image using foam pads onto the larger label.
Embellish with lilac flowers, dew drops and stems in two opposite corners on the labels.
Add the greeting using foam pads, making sure it tucks just under the label as shown.
Add gold pearls as shown to finish.

I hope you like this card, I loved making this.

Have fun and happy crafting,
lots of love
NJ XXX


A really quick Tatty Ted Card....

Happy Saturday my lovelies,

I hope you have a lovely day whatever you may be doing.

I just thought I would show you this quick to make Tatty Ted Get Well card that I made for a friend yesterday.
My friend is a chef so I thought he would like this as Tatty has his chefs hat on! LOL

I used a blue square card blank and matted Me To You papers on it, then decoupaged Tatty Ted as shown. I added ribbon and Card Candi. I have added a small Get Well Greeting to the bottom left corner.


If you are short on time and need a quick card for any occasion something like this is ideal.

Thanks for looking,
happy crafting,
love NJ XXX


Friday 17 February 2012

Glitter Geeks DT Card for this weeks challenge .....

Hello everyone,
yes it's Friday...so that means another challenge
over at the


This weeks challenge theme is
'Girls and Boys'
and is sponsored by


I hope you like my card I have made for this challenge...


I had an idea as soon as I knew the theme. I have made this card by combining images, backing papers and a greeting from Polkadoodles Pretty Tuff CD and an image, backing paper and greeting from Polkadoodles Pretty Sweet - Mini Collection CD

I have made a side step card. Covered with backing papers. Fussy cut around the images, sentiments, hearts and skate board. Inked around the edges with Tim Holtz Distress Ink Vintage Photo.

Attached a length of ribbon down the left side of the green flower backing paper and stuck to the base card, added a bow.

I used foam pads to attach everything else to the card. To finish I have embellished the flowers in the basket with adhesive dew drops and added adhesive pearls to the card as shown.

I wanted this card to depict young love...the boy is stood quite casually thinking of his girl, hence the love heart above him. The girl is stood thinking of him with the hearts floating from her mind.
The boy is saying 'Hi' to her and the sentiment 'Thinking of You' means for this card that she is thinking of him! LOL

Hope  you enjoyed the little story behind my card.

Thanks for peeking,
we would love to see your creations at the
Glitter Geeks Challenge this week!

Oooooooo also I made this card on Valentine's Day so I felt it was appropriate to have some love in the air!

Happy crafting,
lots of love NJ XXXX


New Polkadoodles challenge goes live today......

Hello and a happy Friday from me! LOL

Dont forget there's a new challenge today at the Polkadoodles Challenge Blog, believe me when I say you DO NOT want to miss this one, theres an absolute fantastic prize from Marianne Design who is sponsoring this weeks challenge! Heres where to hop to...Polkadoodles Challenge Blog .Also don't forget that Nikky is back on Create & Craft TV on Sunday at 9am and 2pm. Im excited, wooo hoooo...tune in, another must see and must have item for all you crafters! If your going out then hit the record button, believe me when I say........gorgeous!!!!!! LOL
 Have fun my lovelies love NJ XXXXX

Tuesday 14 February 2012

Polkadoodles Pen & Paper Circle Issue 2............


Hello lovelies,

just thought I would let you know that


is now available to pre-order.

Click on the link above to see what the excitement is all about.
I've ordered mine, make sure you don't miss out and get your order in early!

Issue 1 was extremely popular.

If you fancy peeking to see what issue 1 looked like,
scroll to my post just below this and you will see 3 cards I made yesterday.

It's great value, and your getting a wealth of tips in the comfort of your own home and you can keep referring back to the magazine as often as you like.

I intend collecting every edition as I want to build  a library from the

Hop over, and place your order.

You will be glad you did,
have fun and a very happy crafting from me,
lots of love
NJ XXX


Monday 13 February 2012

Polkadoodles - The Pen & Paper Circle.....

Good evening you lovely crafter's.

Well today I have had a very crafty day. I have been playing with my stamps, cd of backing papers and alphabet and The Creative Chronicle Magazine....of which all three form the fabulous.......

Polkadoodles - The Pen & Paper Circle!


I absolutely love this magazine, there are 12 brilliant projects from very talented and inspirational people.

This is the first copy of this magazine and for the price of £12.99 believe me you are getting an absolute wealth of tips, crafty ideas, step by step projects and just sheer loveliness. I love it also for the fact that Nikky and her design team have used the same image and in very different ways too.

So heres where I am going to get a little bit excited if you don't mind....wooo hoooo...

I wanted to make something really really girly and beautiful, a bit blingy, with some of my favourite things on.....so with a combination of ideas using the magazine and also incorporating my own ideas too here's what I came up with......


Ingredients.........
Papermania 8x8 card white card blank/ Pen & Paper circle stamp and backing papers/Memento Ink Tuxedo black/Spellbinders Grand Nestabilities Labels Eleven/Letraset Flexmarkers in Shades: Champagne/Light Fawn/Linen/Antique White/Tea Rose/Pink Lavendar/Shocking Pink/Watermelon/Meadow Green/Apple/Soft Aqua/Glacier Blue/Aquamarine/Blue Grey 1/Canary/Cappuccino/Nutmeg/
Vintage buttons/Silver vintage bead/Length of pearls/Bling/Vintage lace/Feather/Self adhesive pearls/Polkadoodles Ribbon Roses - Sheer Pink /Ranger Stickles glitter glue in Diamond/Hat pins.

Recipe......

Round the corners of the card blank.
Cut a square of gingham paper to size leaving a white border on the card,round the corners, ink edges and stick to base.
Cut a square of strawberry paper to size, round the corners, ink the edges and stick on top of the gingham paper so it is rotated slightly.
Stamp the image onto your nestie. Colour in with your chosen medium.
Use foam pads and attach to the top centre of the card.
Attach the lace first,sticking the ends on the underside of the card front with double-sided tape. Attach the row of pearls in the same way, the sheer rose ribbon and also the bling.
Stamp the roses, colour and fussy cut around them all.
Attach to the corners with foam pads.
The greeting is coloured with my flexmarkers, cut out and attached with foam pads.
To finish I used my vintage buttons, bead, bling, hat pins and Stickles on the roses and buds.

I absolutely love this image, and I love this card. I hope you all like it too!

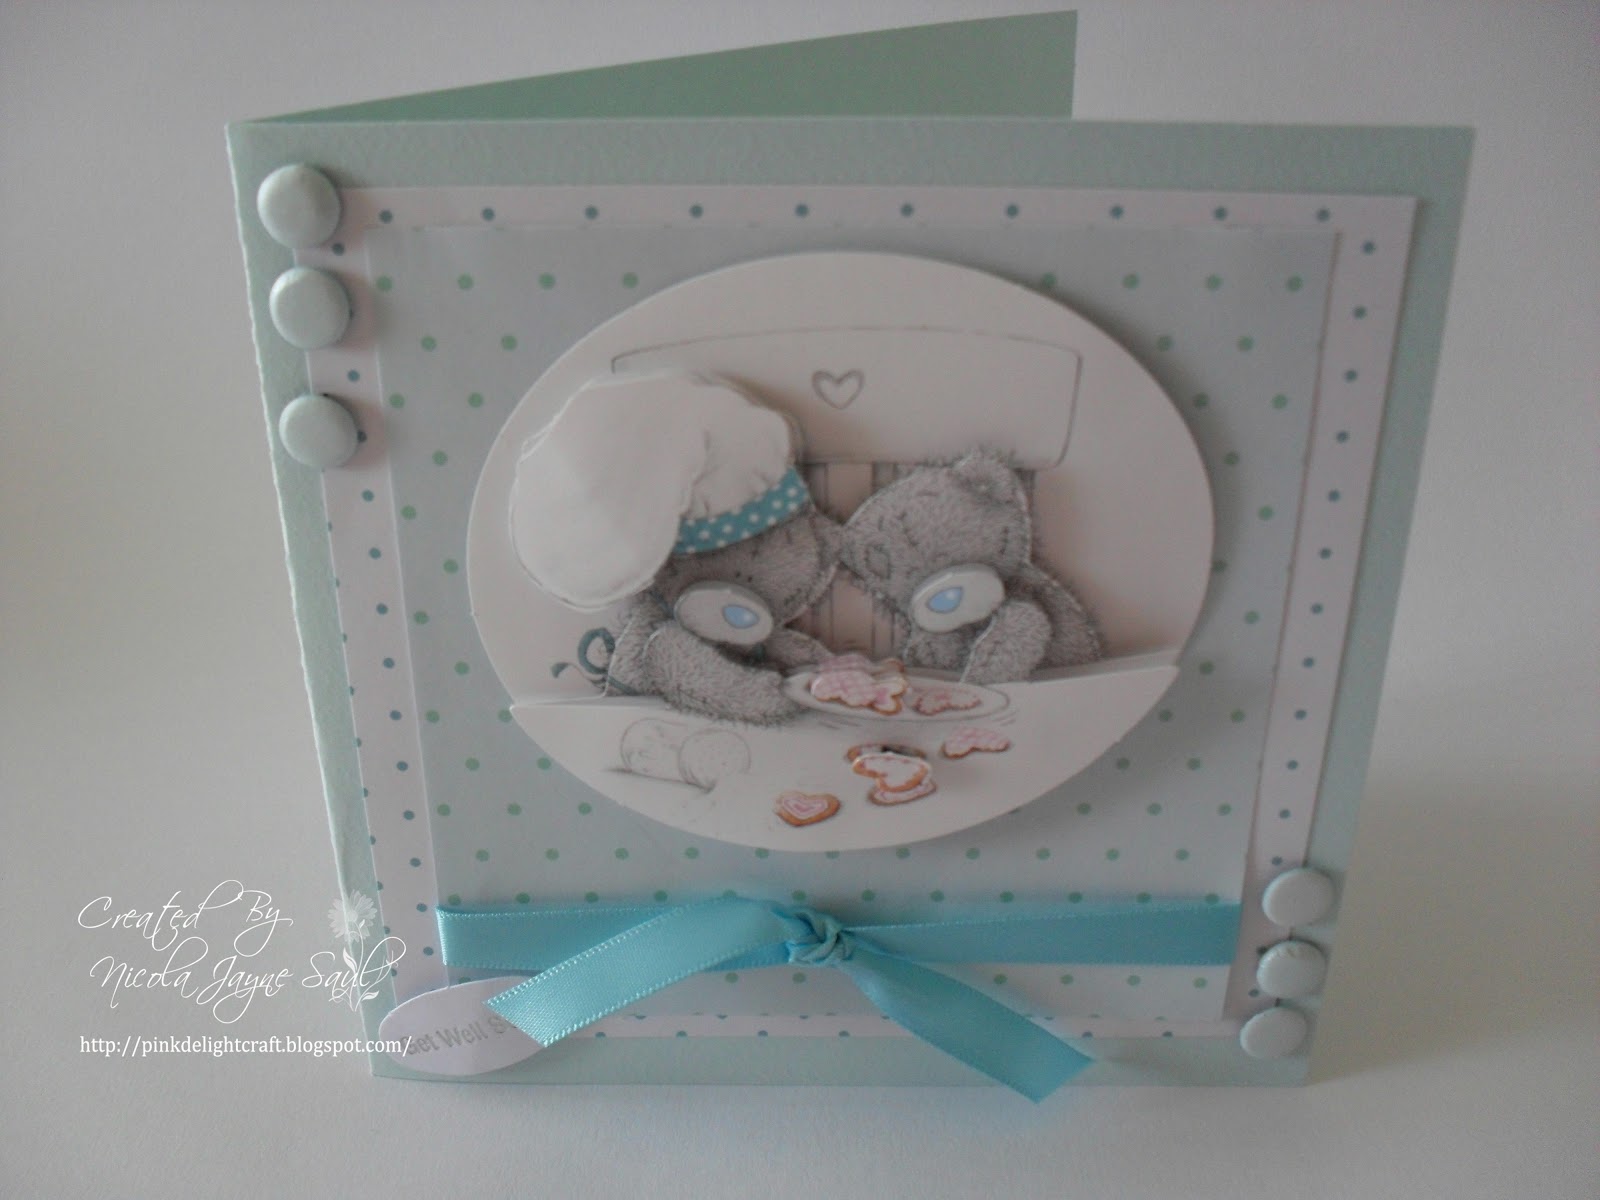
Anyhoo, it does'nt end here. So I decided to make another card again using the same stamps. With the second card I wanted to stay away from pink and keep the card fairly simple, so here's what I did.....


Ingredients....
Stamp and papers as before/Memento Ink Rich Cocoa/Letraset Flexmarkers in shades: Antique White/Linen/Light Fawn/Champagne/Buttercup/Cappuccino/Nutmeg/Tea Rose/Meadow Green/Apple/Grass/Blue Grey 1/Pebble Blue/Canary
Green Glitter Ribbon

Recipe.....

I covered an A5 card blank with two co-ordinating papers. Stamped the image onto white card and coloured. I cut a piece of the text blue paper to size and inked the edges of this and the image. I used double-sided tape to stick the paper to the card, and added the image with foam pads. I coloured three roses and fussy cut them out(a great tip in the magazine), and three buds and attached to the card as shown with foam pads. Finally I cut the greeting in half so I had just the top and bottom so I could tuck each semi-circle greeting in the corners as shown, I also coloured the greeting to match the card.

I like this card as I think it's quite a fresh look and simple, clean lines!

I certainly have had a busy day.......yes it has'nt quite finished yet!LOL
Finally card number three. I wanted to do something slightly different and I was thinking what I could do, when suddenly it popped into my head to use the alphabet that came on the disc. I have shrunk it down to size.....and this is what I came up with.......


Ingredients....

Stamp and papers as before/Bristol Board/Faber-Castell Polychromo Pencils in shades:
Rose Carmine/Middle Purple Pink/Magenta/Venetian Red/Burnt Ochre/Raw Umber/Walnut Brown/Light Ultramarine/Cadmium Yellow/Emerald Green/Leaf Green/White
Paper stumps and Daler Rowney Low Odour Thinners to blend.
Ranger Stickles in Diamond, Tim Holtz Distress Ink Worn Lipstick.

Recipe.....

Score the front of an A5 card blank down the centre and fold back on itself.
Cover that panel, the inside of the panel, and the inside of the card with co-ordinating paper.
Stamp the image onto the Bristol Board. Colour in and blend as needed.
Cut papers to size and ink the edges with distress ink.
Matt and layer with image and attach inside the card using foam pads.
Colour the greeting and cut out, attach with foam pads.
Cut out the letters from the alphabet to spell 'MUM'.
Cut out one oblong of the green strawberry paper to fix the 'U' onto. Ink the edges of the card and the oblong with distress ink. Attach the oblong and letters to the front panel with foam pads as shown.
To embellish, stamp the roses and buds, colour in, fussy cut, and attach to the card as shown. Cut out Strawberries from the green strawberry backing paper and attach three on the front panel with foam pads and a double strawberry inside on the bottom right corner. Finally, add stickles to the rose buds and strawberries.

I think this would make a great card for 'MUM' for a birthday or even Mother's Day.

I just wanted to show you that you can achieve so many totally different looks using the same image. That's why I wanted to show you a version using my Polychromo pencils as well as my flexmarkers!

I have plenty more ideas to play with yet, so with a combination of ideas from the magazine and my own ideas I will be able to create so many more versions of the stamp set.

If you don't want to miss out on
The Pen & Paper Circle
Issue 2....

I do know that it is available to order from the 15th February, due for delivery in April.
Here is the link to see what it is all about. This shows Issue 1 which is sold out but at least you can see for yourself what I'm talking about.


I hope that you have enjoyed reading what I have made today and I hope you like the cards too! Thank you for taking the time to peek I really appreciate it.

Don't forget too that Nikky from Polkadoodles is back on our screens at Create & Craft  TV on

Sunday 19th February

9am and 2pm

and

Tuesday 28th February

10am and 1pm.

Believe me, you don't want to miss these shows, so if you have to go out make sure you record them!LOL

Have fun and happy crafting,
lots of love NJ XXXX